Sunday, December 18, 2011


Happy Birthday to my baby..Mason Riley I love you!!  Here is how he woke up this morning...
 
 I snuck in while they were sleeping and left this for him to find this morning when he woke.  He got to burst through it like a superhero! He was so cute, half asleep, and happy! Happy Birthday Mace-ee!! Love you so much!!

Sunday, December 4, 2011

Wherever your road takes you..

Here is one of the 2 page layouts I made for sketchsupport.  The original pics on the site were really yellow so I retook them and  hope these are a little better.


"You make life sweeter!"

Here are a few pictures of the goodies I made for the MOPS steering team this week..they turned out so cute!
Can you guess what they are?

They look so yummy! And they are fat free!!!

Wednesday, November 23, 2011

LONG TIME COMING..or maybe going..

Ok I have to say that I have been missing in action lately.  My boys have both been ill and are having to have breathing treatments every 6 hours right now so I haven't tried to post this week..however, I HAVE tried numerous times before that these last few weeks and it would show my post in blogger and just keep saying it was saving..saving.. saving.. and NEVER post!! I have had things to update but got so furious I just gave up.  Then the boys got sick, so FINALLY this week it appears blogger likes me and it posted!!!   YAY!!

Because I am so far behind, I am going to post just pics of my recent Sketchsupport stuff and then I have an announcement.
Please ignore date on this..it is way off and i didn't realize the date was on the picture b/c it doesn't show up on the camera! I would have taken another one but i had already given it away before I posted it.
All these are from sketches by Allison Davis and the original sketches can be found here: just click on card sketches.  NOTE** The last 3 are from the same sketch!!

As for the announcement, I want you to know that I have decided I will not be reapplying for the Sketch support Design Team again this coming year. As a matter of fact, the team call ends today..if any of you are planning on giving it a shot : )

I LOVE sketchsupport and have had a great time this year and Allison has been GREAT to work with.  I will certainly be following along this coming year.  I plan to keep doing sketches and posting my projects here as well.  I thank all of you for "following" me and hope to keep up my blog better this new year. (That's actually 1 of my new  years resolutions  LOL : )  I guess you could say "my cup runneth over" this year and not always in a good way. I have been so busy that I have not been able to spend time with my kids like they deserve and I want that to change. I am hoping that by changing some of things that I currently do that come with deadlines and extra responsibilities, we can spend more time together. And who knows, maybe even have a few more photo opportunities for those scrapbook pages. (*wink*wink*)  I can't wait to see the new sketches this year and see who makes the team.

Thanks again for being patient when there have been a lack of posts and know that I never forget you..sometimes blogger is stubborn and posts are late, and sometimes I'm just enjoying life and will tune in soon with a scrapbook page to share it with you.


Tuesday, November 8, 2011

Fall Family pics and Daddy's Big Deer!

This weekend we decided to take advantage of the BEAUTIFUL fall colors we have right now.  Mom and I took the boys to the Linden Bridge, Ozark Park, the old Mill, and a pumpkin patch for pictures and fun. Then I took the boys to Fall Festival at our church..all in one day! I must say it was an exhausting day in more than 1 way.

Getting my children (Caden to be more exact) to take a decent picture is like pulling teeth.  He is the king of the cheesy, grit your teeth, squint your eyes, smile.  He either looked in pain, half asleep, or possibly heavily medicated in most of the pictures.  I was REALLY getting frustrated..he has such a sweet smile, and beautiful blue eyes when he shows the little boy I know is in there..but get out a camera and he disappears and a whole new person shows up.  We just had to laugh because you can literally see him change and as soon as you say, "CHEESE, SMILE," or whatever else you can think of to elicit a smile. Mason is almost always genuine and I can say, "I love you!" And he says it back to me with his usual happy smile.  I managed to get a few decent ones of Caden by saying "I love girls" or something he considered embarrassing.


Then to top it all off, as they were supposed to be getting back in the car to drive further down the river bank, Caden starts wailing about Mason splashing him with mud.  URGHH! Mason had thrown a rock at him which landed in a huge mud puddle right at Caden's feet..he was covered in mud from head to toe.  In his new clothes and we had only snapped about 5 pics so far.  I was SO MAD. Frustrated is an understatement! That's boys for you, they are drawn to dirt and mud puddles like a bee to honey.

Even though it took all day, several arguments, whines, and a few bribes later, we had a handful of good shots.


On Sunday evening, Keith went hunting and shot the biggest buck he ever had with his bow. The boys were super excited.

Tuesday, October 11, 2011


Here are the 2 cards I made form the card sketch @sketchsupport:


 "Friendship" card by Amy Roller
Supplies - Cardstock: Stampin Up!; Stamps: Stampin UP!, Close To My Heart; Ink/Markers: Archival, Stampin Up!; Blender pen: Stampin Up!; Patterned paper: unknown; Ribbon: Micheals,; Glitter Accent: Stickles (Patina)

On this card I made everything 1" smaller because of the size of cardstock I was starting with. I layered my cardstock, paper and ribbon as follows: yellow/blue/pattern paper/ribbon/yellow/white and also used a border punch on the pattern paper piece. The ribbon is another variation instead of a striped paper.
I decided to use stamps directly on the layered cardstock rather than add a 3D embellishment and I used flowers and a butterfly instead of stars and swirls. Next I stamped my images and then colored them using five different colors. I then blended them with a blender pen to create a water colored look. I also added in some shading around the bottom of the pot and butterfly.
I stamped the flowers twice and colored the second image as well them cut out just a portion of the flowers and popped them up on top of the first image to add depth and detail.

Next I added Stickles to the center of each flower.

Last, I stamped my sentiment and matted it as well, placing it in the bottom left of the card.

This next card, was so easy and is one of my favorites!


"It's Time to Party" card by Amy Roller
Supplies - Cardstock: Bazzill; Patterned Paper: My Minds Eye, Bella Blvd; Embellishment stickers: Simple Stories, My Mind's Eye; Other: Thread

I followed the measurements for this one and placed my patterned squares and then followed with a solid pattern instead of the stripe shown. I felt it looked to busy with a stripe but wanted to have the same effect so I did an accordion fold across the strip before I stuck it down. Next I placed the solid cardstock and another pattern.

I then stitched around the edges of the top square and added my large star embellishment. I hand wrote "It's time to..." on a piece of patterned paper and placed it next to the star with pop dots. Then added the "PARTY" sticker below it as well as confetti and other mini star stickers . I popped this layer up as well to add dimension.
That's it for this week, next week will be 2 page layouts! Come back to check them out!


Don't forget to head on over to Sketchsupport to see what everyone else has done with the sketch as well!
Sorry there hasn't been any post recently. To put it mildly, you could say we have all been a little under the weather! A little over a month ago, Caden developed a cough that sounded horrible and wouldn't go away. I finally gave in and took both boys in to see Dr. T when it wasn't getting any better and Mason now had the same cough.  After seeing Masons throat, they gave a cough med and some antibiotics.  Fast forward a week later, Caden sounded a little better but Mason sounded worse, so back to the Dr. we go.  They give us a different antibiotic, and breathing treatments for Walking Pneumonia.  This is on a Thursday.  Late Friday night into Sat. I start feeling really really bad.  I hurt all over and had the worst chills.  I was running a temp of 101.4 so I had to skip my all day scrap event  : ( and wait for the Dr. to open.  Finally around 10:00 I got in and they ruled out strep, and did a flu test, sending me home with Tamiflu and a Rx in case in wasn't the flu.  Upon getting home and starting the meds around 11:00 I began vomiting.  This did not stop for hours, my fever went to 103 and I received a call from the Dr. saying my test was positive for the flu.  Yay me.    I literally felt horrible and slept for hours upon hours. I was quarantined to the bedroom and my kids were taken to my moms. I finally emerged on Mon. to pick Caden up from school and was greeted by a pink-eyed little boy.  We picked Mason up and headed home to find the eye drops leftover from the last time.  We all went to bed, none of us feeling to wonderful.  Then around midnight, Caden woke up vomiting everywhere. Again, yay me..

I won't gross you out any more than necessary, but let's just say when your sick yourself you DO NOT want your night filled with vomit that requires the aid of our outdoor power washer and a spatula to make your clean-up job easier to say the least. I was on the verge of tears..I cannot tell you how badly I wanted to wish myself away..I probably didn't handle it the best but to my credit it has been a very exhausting, awful week.  We decided to send mason on to school since he seems to be healthy other than the annoying cough that won't quit. It certainly isn't a good thing to hang around here.  For my benefit and the schools, I hope we do not regret that decision! We have an appt.  to get Caden in to see the Dr. this afternoon to check to see if he has the flu...please pray for our family that no one else gets it and that we can all get healthy!!!


****UPDATE**** Caden checked out negative for the flu so that's good, they think i have a stomach bug on top of the flu..(I figure I probably picked em both up @ the Dr. office Thurs.) so now we just have to wait out this stomach bug that we are sharing!

Wednesday, September 28, 2011

Cutest Tough Guy EVER!

First..a big shout out to Daddy for taking these awesome pics for me to scrap! I wasn't home and he thought to get the camera..I am slowly training him to think like a scrapper!

This was Mason's first time ever to shoot his bow.  It looks like he did a great job. I love that tough guy-I mean business look he has. So cute! He even hit the target! Way To Go Mason!

Tuesday, September 27, 2011

2 page Birthday LO on Sketchsupport


"Spongebob Birthday Bash" by Amy Roller
Supplies - Patterned Paper: Sandy Lion, Two busy Moms, unknown; Ribbon/Twill: unknown, Jillibean Soup; Cardstock: CTMH and Bazzill; Stickers: Unknown, BoBunny, K&Co; Other: Sharpie marker Sketch:Allison Davis
I followed the sketch fairly close on this one. I didn't have a die cut paper that matched my color palette or theme so i just traced around another one from my stash onto the back of the Spongebob paper I wanted to use and then hand cut it, making my own.

The flap and Spongebob drawing are the other variations I made to the page. I wanted to keep his drawing he did for his Birthday that year and incorporate it into the page so I used it in place of the 5 x 7 pic. This worked well because it's roughly the same size.

I added a sticker and another small photo here as well. I made this area a moveable element with a hinged area that you can lift for more journaling and memorabilia.


Next I put my squares in place along with the 4 x 4 photos. I did add an embellishment in place of one of the pictures on the right side.
It was from the Birthday card I made him that year. I also added another part of the card under the flap on the left side.

I kept with the 4 x 4 pics and squares for the others with exception of one. On the square next to the journaling box I added two small square pics and an embellishment on top of a 4 x 4 square.

This allowed me to add more pictures and follow the theme of the layout with the "KA POW" sticker without really messing up the overall 4 x 4 design.

Because my papers were so themed and specific, I didn't have a coordinating group to pull other patterns from. Instead I used twine and twill ribbons in place of the pattern paper strips and stripe. They also helped me pull in more colors that coordinated with the pictures rather than my main diecut papers.

The overall theme of the layout was lots of animation and movement. I wanted it to have a child-like cartoon feel to it and so there are little "doodles" and very graphic bold faux stitch lines. It's not meant to be exact, which is not my norm, but was definitely more fun and less stressful making! I didn't worry about it all being just right, I had more fun with it. I love it when my actual photos inspire me! I would have NEVER doodled and such on a layout before so this was a teeny step out of my usually very organized box!

Tuesday, September 13, 2011

New card from sketchsupport

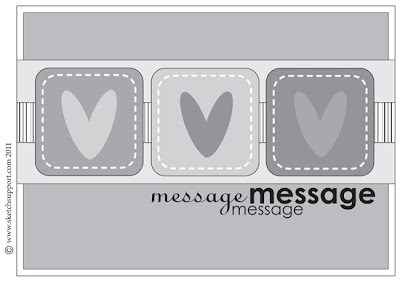
Latest card sketch from sketchsupport:
sketch by Allison Davis


"Love You Sweetheart" card by Amy Roller
Supplies - Patterned paper and cardstock: Stampin Up!; Dotted paper: My Mind's Eye; Chipboard heart: Making memories; Stamps: Stampin Up!, unknown

I decided before I started that I was going to use some of my scraps for this card. I dug out some things that I liked and started. I liked the swirl border in place of the stripe and really wanted more of it to show so on a whim I just left off the two end squares. That is another great thing about sketches, you can alter them to fit your papers, your style, or your mood at the moment. While I was changing things, I added a thin strip along the background border on top and bottom.

I added a few small sentiments to the bottom corner and popped up the remaining square in the middle. I added two layered hearts and inked the edges as well. This went together really quickly and I managed to use up some scraps out of my overflowing drawer!

2 sketchsupport layouts..

Here are 2 sketches and the layouts I made from sketchsupport! 
Following sketch by: Allison Davis
This 1st one I followed with a 2 page Layout and here's the details:
"Backyard Fun in the Sun" by Amy Roller
Supplies - Patterned paper: Bo Bunny, Two Busy Moms; Cardstock: Close to my Heart, Stampin Up!;
Stickers: Karen Foster designs, Creative Memories; water droplets: Hobby Lobby; Liquid glass: Close To My Heart; Cuttlebug, Emboss folder: Provo Craft; Markers: Zig, Stampin Up!; Blending pen: Stampin Up!; Journling Spot: My Little Yellow Bicycle

The main variations for my layout are that I changed the picture sizes and have a total of 13 photos on this page! I also changed the "waves" along the bottom and turned it into grass and a water hose instead. I left off the fish elements along the bottom because I didn't have anything that really fit my changed theme. Instead, I added more detail and texture to the hose.

I started the layout by arranging my pictures on the left side and it just worked out that I could fill the bottom area of the page that only has three small photos in the sketch.
I cut the large sun out of my pattern paper and used it to ground my title. I added in small water sprinkles with 3 -D "droplets" and crystal effects to create a "wet" look.

Next I decided to use leftover grass from my cropped photos and cut it to look more like actual grass blades and then placed it along the bottom. This is where the waves in the sketch are.
I then put down my pattern strip that is in place of the stripe in the sketch. I would have preferred the stripe but I didn't have one so I improvised with something close that pulled in all my colors.

For the right side, I had a ton of small photos so I made a collage with them in the place of the three large photos and decided to leave some background paper showing to help break up the photos because there was so much green throughout them.
Next I hand cut a hose and ran the pieces through an embossing folder with my cuttlebug for the texture of a real hose. Then I covered it with liquid glass which makes it shiny and more 3-D. For the end of the hose I hand drew and cut out a shape like the metal end of a hose and then added a silver gel pen over the whole piece.
Next, I added a large swirl rhinestone and more liquid glass coming off in "splashes". I added more water "droplets" throughout as well as water stickers. Last I traced the flow of water with 3 different colored markers and blended them out with a blender pen to give it a more lifelike see-through look of water.The second layout, I made a 1 page with the same sketch..sorry pics are a little yellow!

"Busted" by Amy Roller
Supplies - Patterned paper: Creative Imaginations; Cardstock: Close to my Heart; Stickers: Creative Imaginations, Bella Blvd; Flocking: Enchanted Creations

On this layout, I used the left side of the two-page sketch. I flipped the pictures to have the three on top and one on the bottom to leave room for the bottle of baby powder and mess. I sort of kept the swirl element from the right side of the sketch as well and incorporated it into the bottom left corner.
To make the spill of powder, I used my finger to dab glue all over and then applied flocking over the top. Then I added in little embellishments across the page. Some are stickers, some are hand cut from the pattern paper.
This was a real quick layout and I love these pictures even though I wasn't very fond of the mess!

Monday, September 12, 2011

Scrap-a-palooza Layout

This Saturday was yet another awesome Palooza!  We had a great time and I met some great new people to scrap with! (Shout out to Cindy!) Here are a few pics of the only page I can show you..the others are for Sketchsupport so you will have to keeping checking in there to see the rest (wink, wink!)


Sunday, August 28, 2011

This is an old layout (notice the bad perm, and lots of extra baby weight via the one hanging off my hip!) but it is a LO that we did from a class at Scrapbook Generation several years ago...no it didn't take me quite that long to finish..but close to it!  I LOVED this class when I saw it and had a ton of pumpkin patch pics to use.  However, Allison made hers look flawless..mine not so much.  I had a hard time getting my pics to fit and sewing through 3 layers, I ended up having a few tears.  All in all, I would like to try this again with a different word, loved the concept..but it does require patience.  Something God is still trying to teach me!  :0 )  But it is another greatly designed page from Allison!

Popular links to check out!

These are a few of the blogs I follow or visit frequently for a quick dose of inspiration!
The sketchsupport team members are listed here as well!

SketchSupport DT:
Allison Davis
Carolyn Wolff
Christina Hoffman
Christine Chain
Christy Arthur
Jennifer Larson
Jill Sarginson
Katrina Hunt
Lynette Jacobs
Megan Bickers
Melissa Bell
Melissa Elsner
Mireille Divjak
Noey Hunt
Robbie Herring
Shari Thurman
Suzanna Lee
Tammy Tutterow
Tammy Volland

Blogs I visit:
crafty storage
sewmanyways
spotmyeye
Scrapbook Generation
Freedom in Creating
twisted chick
fresh and fun

Will add some more later, gotta go run some errands now!

Tuesday, August 23, 2011

Most recent on Sketchsupport

This week and the last I have had a few projects posted on sketchsupport.  The first was made from a birthday hat sketch which I flipped to make a flower bouquet.


And this is what I made:


"I Love You" by Amy Roller
Supplies - Patterned paper/Cardstock: unknown, Stampin Up!, Lasting Impressions, Bazzill Shimmer;
Stamps/Dies: Papertrey Ink; Ink: Stampin Up!; Flower: Prima; Border strips: K&Company, Close To My Heart; Felt: Papertrey Ink; Pearl: Close To My Heart; Other: Thread, Rhinestones

I decided to flip the sketch and use it as a bouquet of flowers. I kept the scallop from the bottom and added it to the top border of the bouquet.


I stuck with the shape and made it sort of a pocket for the flowers. The flowers are my version of the "poof" that sits on top of the hat. It's all there just a little rearranged!

To start, I hand cut the triangle shape and made it into a 3-D pocket with the border trim attached. I then cut a pattern and solid strip to add across the front of the project. I put the pocket down on top of this and used a die to cut the "you" out and adhered it down as well. Next, I stamped the "I love" above it.


For the flowers I used border strips that I rolled up and held with adhesive. I then "folded" the edges of the strips down to make flowers. I then added a pearl and rhinestone to the handmade flowers. For the last and middle flower, I used a Prima flower with more pieces of the green border strip to make leaves behind the flowers. The two handmade flowers also have a die cut felt flower base.

Last I stitched a border around the base of the whole piece.

I will be putting this in a shadow box frame in my home.

This week is the 1 page sketch:

I made this:
"Little Brother, Big Love" by Amy Roller
Supplies: Patterned paper: American Crafts; Letters: American Crafts, Fancy Pants; Felt: Papertrey Ink; Ribbon: American Crafts, unknown

One of the biggest variations I made to this page was deciding to use a pattern paper for the base. Because I only had two pictures to use, I also left off the three small photos and extended my title to that area. 

It helps draw your eye down and across page just as the photos would have. I followed the rest of the sketch pretty close, but used a ribbon across the bottom in place of the stripe because I didn't have a stripe that matched.

I added a few more ribbon strips in the top left corner to balance out my long title on top.


I just cut varying strips of coordinating ribbon and then cut an upside down "v" on the ends to form the pennant shape. I also hand cut several hearts in different sizes and colors of felt to sprinkle throughout. I topped them off with rhinestones or mini hand cut hearts from patterned paper.